Setting Up The Environment
In this tutorial, we use the following development tools:
- Java Development Kit 1.8 , or higher
- Apache Maven ,
- Eclipse for Java EE Developers
- Any common application server, such as IBM Websphere, Jetty, Tomcat, Oracle Weblogic. In this article we will be using WildFly .
If you already have these installed, feel free to skip to Step 1 - Creating your project with a Maven archetype .
First, you need to install the tools required to use the JBStrap framework. These tools are not part of the framework but they are needed to develop, compile and/or run your application. This document describes the most commonly used tools but you can also use other compatible development and project builder tools.
Java Development Kit
For application development with the JBStrap full-stack framework, we recommend that you use Java 1.8 or higher version of the JDK.
Click here to download and install the version of Oracle JDK 1.8 that is compatible with your operating system.
After installing, you also have to setup the JAVA_HOME environment variable.
Configuring JAVA_HOME environment variable on Windows :
Locate your Java installation directory
If you didn't change the path during installation, it'll be something like
C:\Program Files\Java\jdk1.8.0_301You can also type
where javaat the command prompt.- Do one of the following: Windows 7 – Right click My Computer and select Properties > Advanced Windows 8 – Go to Control Panel > System > Advanced System Settings Windows 10 – Search for Environment Variables then select Edit the system environment variables
- Click the Environment Variables button.
- Under System Variables , click New .
- In the Variable Name field, enter
JAVA_HOME. In the Variable Value field, enter your JDK installation path.
If the path contains spaces, use the shortened path name.
For example,
C:\Progra~1\Java\jdk1.8.0_301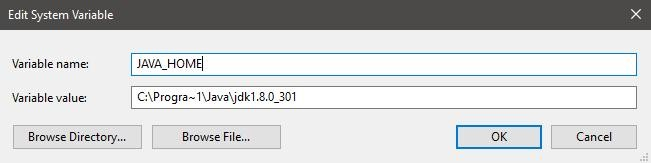
Note for Windows users on 64-bit systems
Progra~1 = 'Program Files' Progra~2 = 'Program Files(x86)'
- Add the path to the JAVA_HOME/bin folder to the PATH environment variable. This can be found among the System variables.
- Select the PATH variable, and click on the Edit button.
- Add the path of the %JAVA_HOME%\bin as a new value

- Click OK and Apply Changes as prompted
Notice: You'll need to close and re-open any command windows that were open before you made these changes, as there's no way to reload environment variables from an active command prompt. If the changes don't take effect after reopening the command window, restart Windows.
Configuring JAVA_HOME environment variable on Linux:
Get the path of Java:
- This path has to be used when setting up the JAVA_HOME environment variable. The environment variable can be found in the .profile file in the user home folder. Use the following two lines: export JAVA_HOME= $ which java (the path you got from Step 1.) export PATH=$JAVA_HOME/bin:$PATH For example: export JAVA_HOME=/usr/bin/java export PATH=$JAVA_HOME/bin:$PATH
Configuring JAVA_HOME environment variable on MacOS :
After installing java, you can setup the JAVA_HOME variable with the following command:
In place of the JAVA_VERSION, input the version number of your Java installation:
To check if the installation was successful, type the following command into a terminal window (command prompt if using Windows):
If the installation of the Oracle JDK 1.8 was successful, you should see the following message:

Apache Maven
Maven is a widely used compiler tool for Java development. Maven simplifies the translation of Java applications with automatic dependency management in a unified project structure. Because of this, Maven is one of the most popular compilers used for Java web development. It is supported by most development tools by default so you may not need to install it manually. If you want to create or compile a project using a terminal, this is a must have.
Download the latest version of Maven from the following link.
Apache Maven comes in a compressed file and not as an executable installer (.exe file), click here if you need help with the installation. .
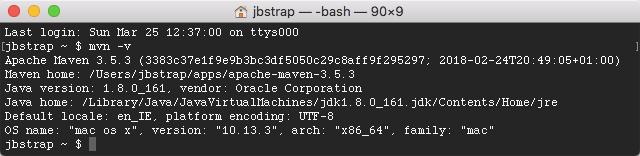
To check that everything is working properly, run the following command in a new terminal window:
You should now see the following:
Eclipse
Eclipse is the most popular integrated development environment (IDE) among Java developers. Eclipse is a free, open-source, platform-independent software developed by Eclipse Foundation. It includes all essential tools for development as well as a plugin system that allows the developer environment to be tailored to your needs. Eclipse’s built-in Maven support makes it even more appealing. JBStrap uses Eclipse as a developer tool throughout all of its guides.
Download and install Eclipse .
Recommended version is Eclipse IDE for Java EE Developers (that is, Eclipse Oxygen 2 (4.7.2) for Java EE Developers).
WildFly
WildFly (formerly known as JBoss Application Server or JBoss AS) is an open-source, free-to-use implementation of the Java EE specification developed by RedHat. Since it is based on Java, the WildFly application server operates on multiple operating systems that have Java support. JBStrap will use WildFly as an application server in all of its guides.
Download WildFly from here .
WildFly comes in compressed format and not as an executable installer (.exe file). You just need to unpack the file into a folder. This folder will be the application server’s folder.
Open a new terminal window and navigate to this folder. Open the bin folder and launch the add-user script.
For Windows:
For Linux and MacOS:
You can find the official guide of the add-user utility here .
This will create a user in the server who will have the right to administer the server and install applications on it.
Follow the on-screen instructions and create a Manager user. Remember the password you entered because you will need it later.