Step 4 Domain Classes
As the first step in the development process, the domain classes need to be created. These classes represent database tables and relationships in the application. Our sample project uses the following domain classes:
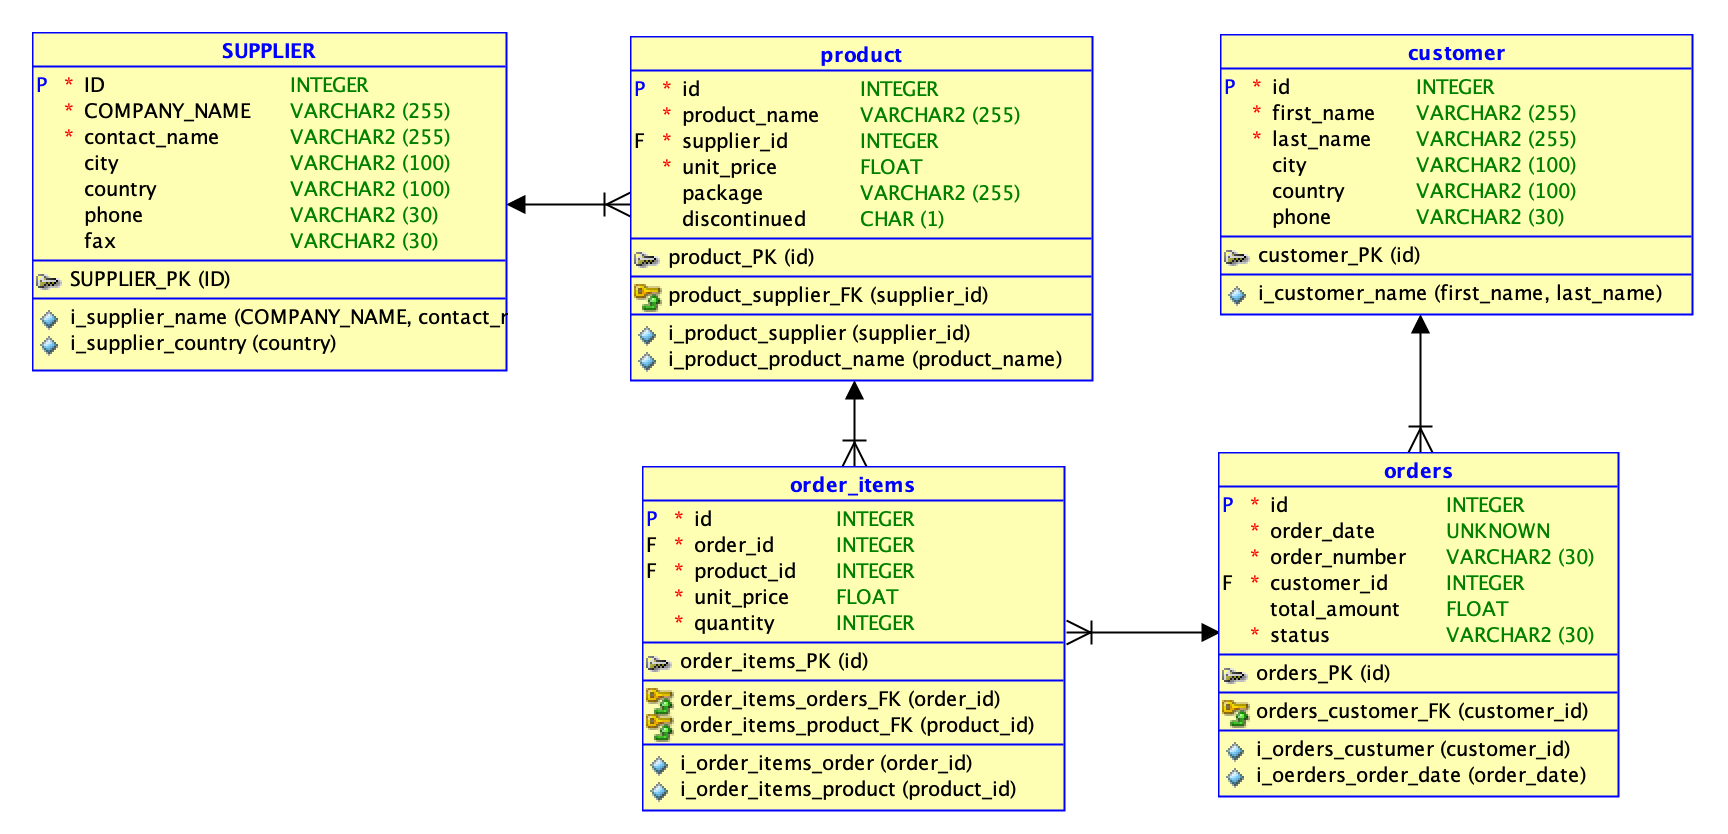
To create domain classes, you need to have a knowledge of the database. The below picture shows the structure of the database for the current project. You can see each table and the relationships between them. Follow the picture to create the corresponding domain classes for each table. Each domain must be created in the com.jbstrap.example.domain package.
Supplier
First, create the supplier class. This table does not reference any tables, so this one should be the last one when creating a chain of references and no other classes need to be there in the code in order to create it.
The above example shows that this is a simple POJO class whose fields correspond to a database table field of the same name. When creating the domain class, you have to use conventional JPA annotations. The JBStrap framework uses the conventional JPA solution to access the data.
Product
Next, create the Product domain class. This class represents the PRODUCT database table. The above image shows the ‘product’ table referencing the ‘supplier’ table, that is, each product has a specified supplier. This relationship is also represented in the domain class, meaning that you must have a supplier class before creating the product class. With this being done, you can use the @ManyToOne annotation and its settings provided by the conventional JPA to create a data relationship.
In the above source code, there is a field that is not included in the database. This is the supplier field. You can see that the type of the field is the Supplier class created in the previous step, that is, the field contains an entire supplier record. As a result of this, if you retrieve a record from the product table, it returns not only its own data values, but also the corresponding supplier values are automatically retrieved, making all data accessible through the Product class.
Customer
Create the Customer class that corresponds to the CUSTOMER table. This domain class is a simple POJO class that does not contain any other references.
Orders
Next, create the Orders class that contains order details. The above image shows that the ORDERS table references the CUSTOMER table. This reference should be included in the Orders class the same way you did for the Product class.
OrderItems
As the last step, create the OrderItems class. This class represents the ORDER_ITEMS table that connects orders with the ordered items. This table is a cross-reference table between ORDERS and PRODUCT.
Based on what we learned above, the OrderItems class should reference the Orders and Product classes. For the purpose of this project it is better if we include only one of the references in the OrderItems domain class. The reason for this is that there is no part of the code that retrieves orders based on the products. In every case, ordered items are retrieved based on the order itself and so the OrderItems class has to reference the Product class only.
Once you have created the data sources, you only need to register them in the JPA layer, so that they can work as separate entities. To do this, you only need to open the previously created persistence.xml file and add the classes to the persistence unit part in that file. Once done, this should look like the following:
You can see that all previously created domain classes are listed within the ‘persistence tag’ between separate ‘class’ tags. This ensures that the persistence layer uses the classes to store the retrieved data.