Step 7 The User Interface
This chapter covers how to implement the code for the user interface and the application logic for different interfaces. It will show you how to create:
Creating the UI
An application can contain multiple UIs, with each UI being either public or private. Public UIs are visible to everyone, whereas private UIs are visible only to logged in users with specific access rights.
If you don’t want to replace, build and send certain components to the client when loading a new page, the best way is to place such components to the UI. This way you reduce network traffic and ensure a faster, smoother user experience.
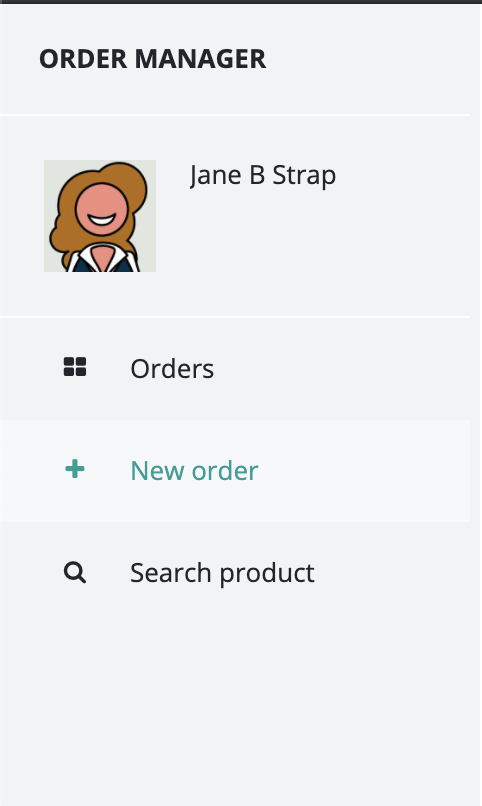
In this example we have a UI class that is public (accessible to everyone) and a sidebar, enabling users to navigate between pages.
To implement the UI, open the `StandardUI` class, created by the maven archetype along with the project itself. Modify the class using the following:
Implementing the UI means creating a NavBar component, configuring it and adding it to the UI.
In this example, we created the Navbar component and set the brand text by using the setBrand method. In the brand text we display the application name by reading the text from the strings.properties file. This is what the MessageSourceAPI.getMessage("application.name”) statement is used for. This statement returns the text constant with the key application.name.
We displayed a user avatar on the menu, set the user name and take advantage of the automatic menu creation offered by the JBStrap framework. We did this by using the addMenu('mainMenu', null, null) method.
The avatar picture should be placed in the WebContent/img project folder.
The first parameter in the method is the menu name, the second one is the menu title and the third one is the logged in user. At this point we only provide the menu name. The framework uses this name to build the menu. mainMenu parameters are only provided in the Startup class, as pages must be created for that.
With these few lines of code we create the menu that should look like this:
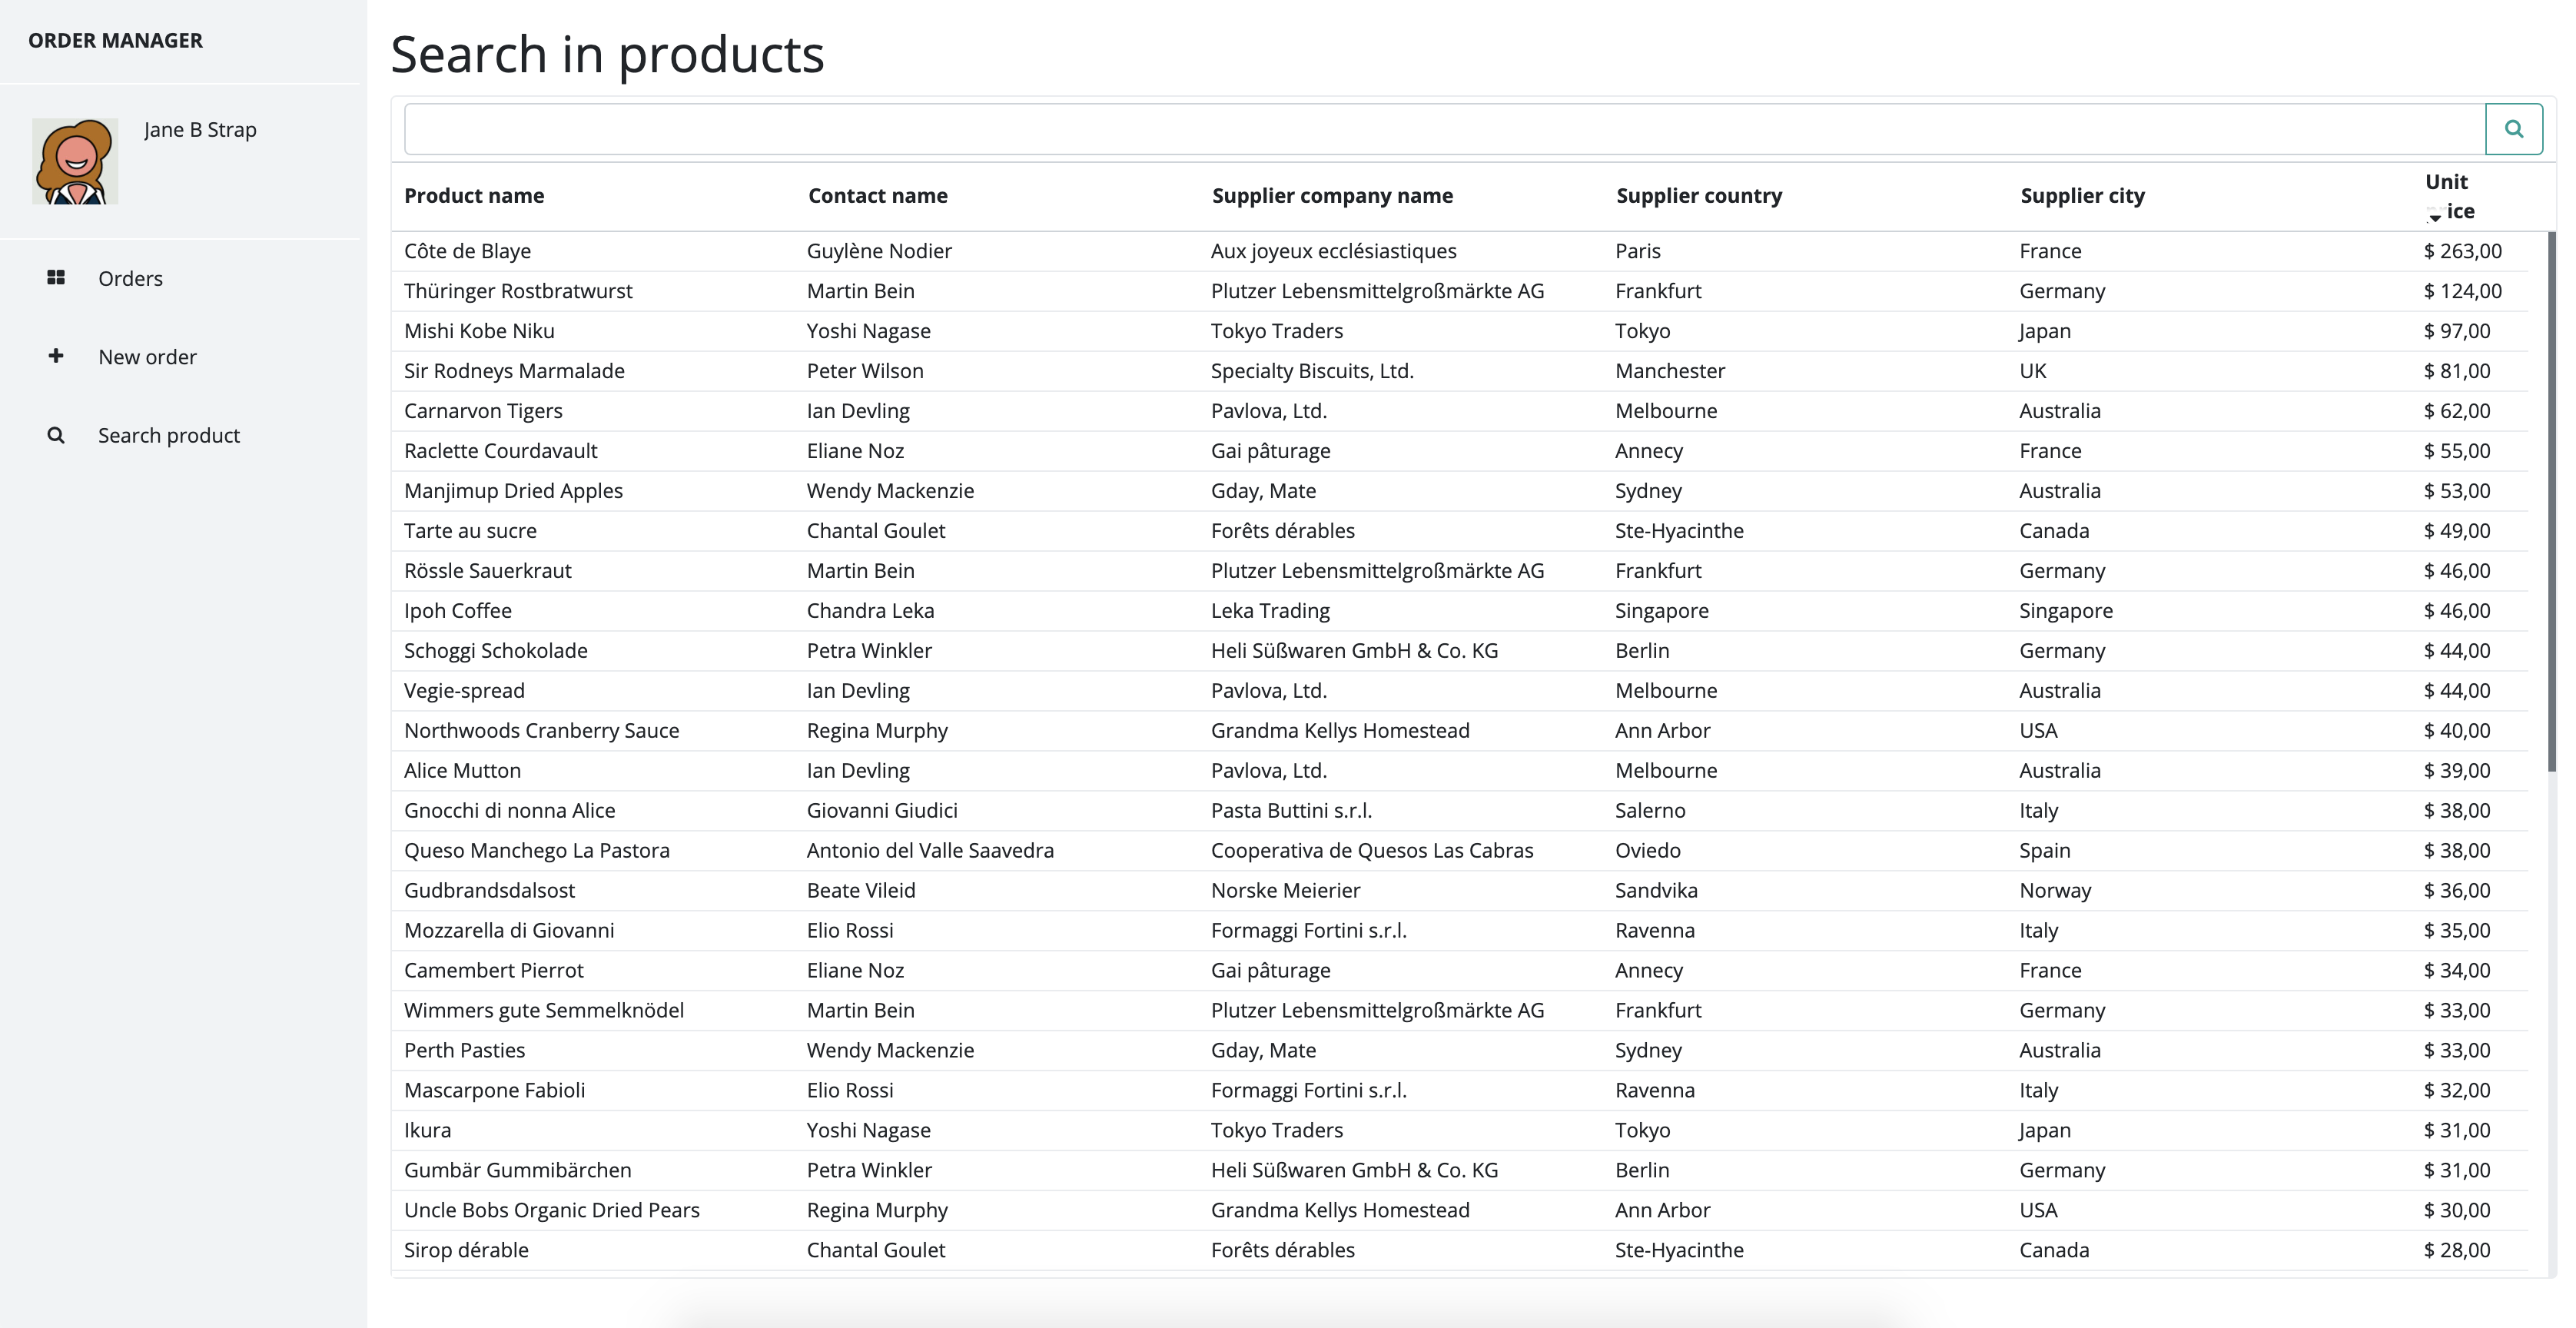
Creating the product search page
This is the simplest page in the whole application and we’ll begin with this one. Create a class called ProductSearchPage by extending the BasePage class. This class is provided by the JBStrap framework and every page must extend this class.
Once this is done, create the `ListGrid` component in the class constructor. The component is displayed as a table. Build the component using the product DataDescriptor and configure it so that it uses a TextFilter to filter data.
If you review your code, you might notice the following:
- `JBStrap.getDataSource (" product ")` This part of the code returns the DataDescriptor based on the productDS.ds.xml class. The DataDescriptor contains the columns and the settings included in the XML file. The **ListGrid** component uses this DataDescriptor to display the list on the UI. Use the `setOrder` method of the **ListGrid** component to set the default ordering of the list. This setting is not required, but if left unspecified, data are displayed unordered. In this example, ordering was set in the ListGrid.
- Use the `setFilterType` method to apply a text filter to the list. Use this a text filter if you want users to search for a specific text in any column of the ListGrid. This filter performs a search in every text column and displays every record with the specified text.
- Also, a lower margin is set for the ListGrid, so it keeps a distance from the bottom of the page.
Next, format the unitPrice column. The JBStrap framework offers an easy way to format columns: get the column from the list and set a formatting:
Now, you only have to add the header to the page. The header text comes from the strings.properties file. Also, add the list to the page.
Note that the code does not contain any part where reading data from the database is performed or where loading data into a table or search is implemented. All these parts of the code are automatically handled by the JBStrap framework, saving a lot of time otherwise spent on coding. If you display the page, data are automatically shown in the table. The framework also performs a lazy fetch, resulting in faster data display, enhanced user experience and reducing network traffic.
Lazy fetch is a database fetch technique which displays only a fragment of the entire dataset. By default, 50 records are displayed at the same time in the JBStrap framework. If users scroll to the bottom of the list, another 50 records are displayed, making it to a total of 100 records visible on the UI. If users scroll to the bottom of the list again, another 50 records are displayed. This goes on and on until there are records to display.
The source code for our entire page is:
The page looks like the following:
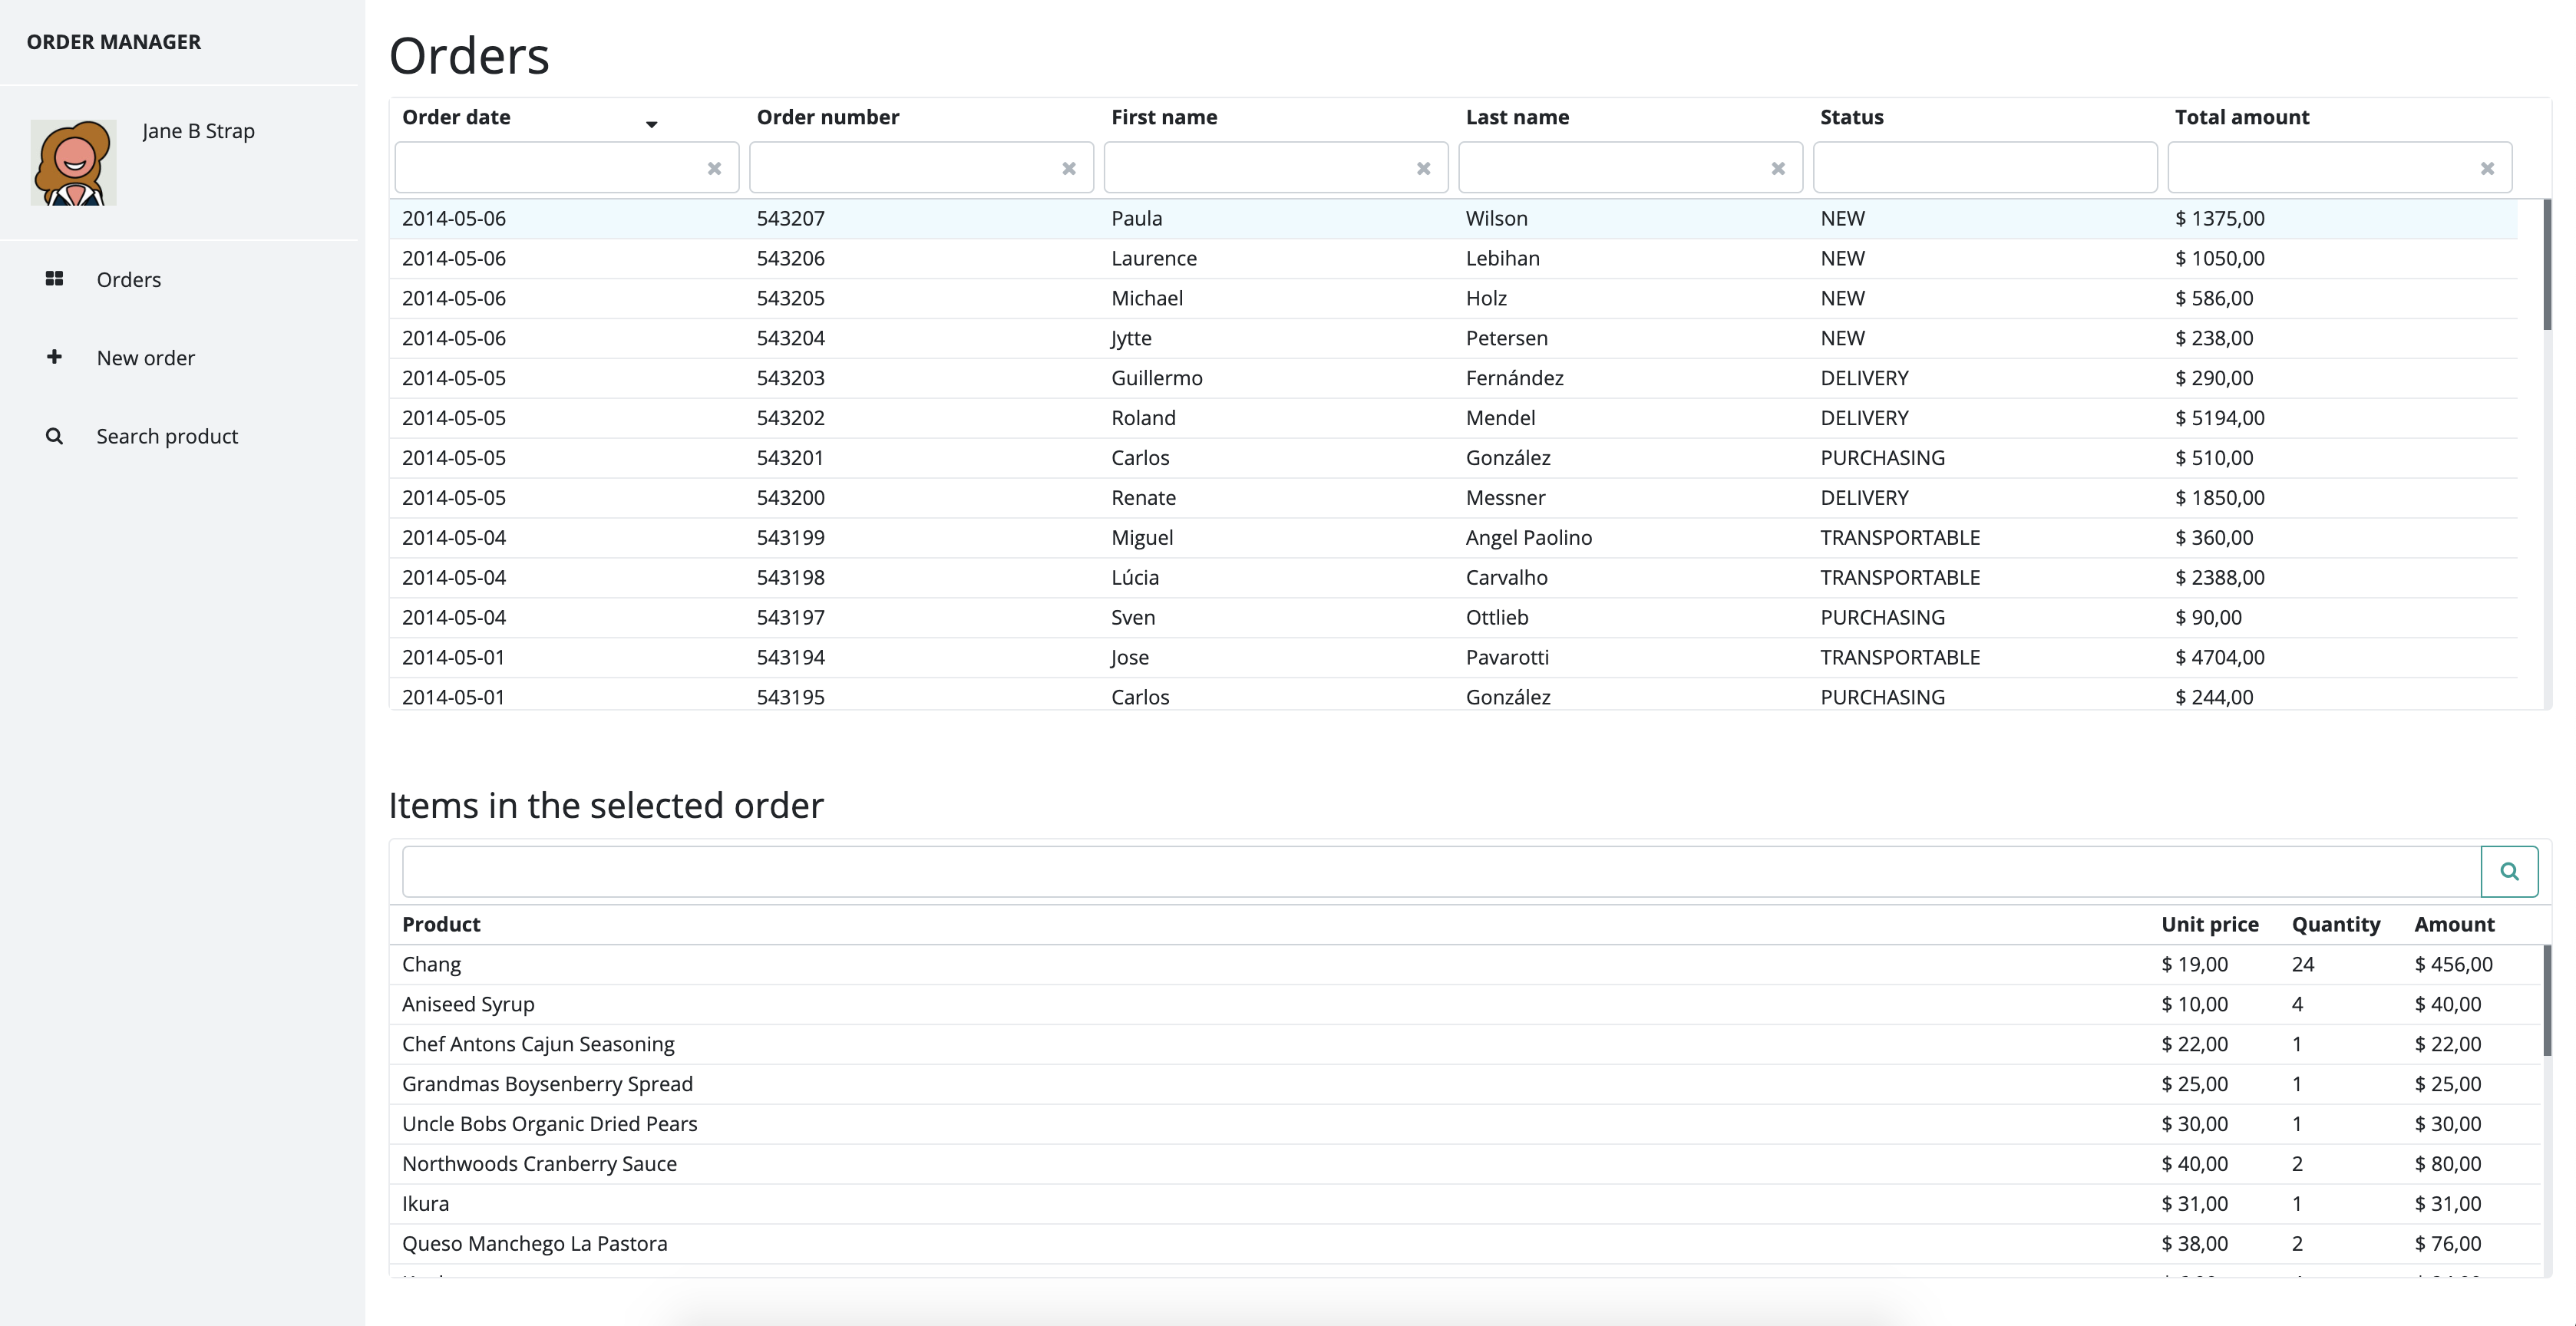
Creating the orders page
We now have a page with a searchable list. Now, let’s create another one that contains several connected lists. This page displays the orders. The page displays every order and also the related items for each order. Also, there is a pop-up window where you can see the details of the selected order, and edit them after pressing a button.
First, create a new class by extending the BasePage class and create its constructor. In the constructor, create the necessary components, such as the list with order details (to be displayed at the bottom of the page):
So far, the page is very similar to the one created previously. Only one setting is different: setAutoFetchData(false). This setting disables the framework’s automatic data fetch function. You have to do it where required by the program logic. In this case, data fetch takes place when selecting an order (you cannot display the order details until haven’t selected one).
The next step is to set the formatting for the column containing a number. We do this the same way as for the previous page: get the columns and set the formatter method. The only difference here is that on this page, multiple columns should have the same formatting. Create a class variable for the formatter method and pass this variable to different columns. The formatting needs to be done only once and can be used in multiple columns afterwards.
Creating a formatter method:
Setting the formatting:
The list at the bottom of the screen is now ready. Create the list containing the orders and set the column formatting:
In this list, we use a different filtering option: the AdaptiveFilter . This filter creates an editor field for each column above the columns and below the column labels. If users enter a value into one or more fields, the list below those fields display only the rows with the specified value(s).
The upper list (the order list) is now ready, we only have to connect them. Add a row click event handler to the ordersGrid list. These click event handlers are executed if users click on a row in the list. This click event handler also implements the update the of the bottom list ( details ):
First, empty the details list (remove all rows previously in the list). This is done by the clear () method. Check if the user has selected an order with the details to be displayed. If an order has been selected, get the unique ID from the selected row using the following code:
The result is the value of the id column of the selected row in Long format. Use this value to compose a filter criterion. This filter criterion can later be used to fetch the records relevant to the order from the database. Use the Criteria class with one criterion:
Set the created criteria as defaultFilterCriteria for the detail list. The ListGrid component supports two filter criteria. One is the the defaultFilterCriteria that cannot be modified by users and the other one is the filterCriteria which can be modified by users. The list contains only those records satisfying both criteria. Now we set the default search criteria that cannot be set by users. Leave the user-specified criterion (filterCriteria) empty. This results in only those records being included in the list that are associated with the order. Since we created the details list by enabling users to filter in the list, users can further narrow down the results.
Call the fetchData() method to fetch and display the records that correspond to the criteria. The details list was created in a way that the framework cannot fetch its data automatically. Instead of the automatic data fetch, now you have to call the fetchData() method.
The two lists are now connected. If users select a record on the top of the screen, details are displayed at the bottom. If left without modifications, the list on the top of the screen would use an automatic data fetch (automatic data fetch is not turned off in this list), but the list at the bottom would not contain any data without selected records in the top list. Without a user click, there are no selected records in the top list.
Add a new event handler to the details ListGrid. This event handler is associated with the fetchDone event and is executed at the end of each data fetch:
This event handler check if there are any default filter criteria in the details ListGrid and if there is at least one order row. If no criteria have been specified yet and there is at least one order, you have to select that order. This way, users will see a correctly displayed form. Note that the event handler is executed after each fetch operation. This means that if a user scrolls down to the bottom of the page and a new entry is added to the list, then the event handler is executed again. This explains why you need to check if a default filter criterion was set. If a default filter criterion is set, the event handler was executed at least once and now you only need to execute it when displaying the page.
In the criterion, first you need to select the first order: ordersGrid.selectRow(0). This ensures that the selected row is included in the ListGrid. Now, apply a filter to the details list by using the unique ID from the selected row and fetch the necessary data:
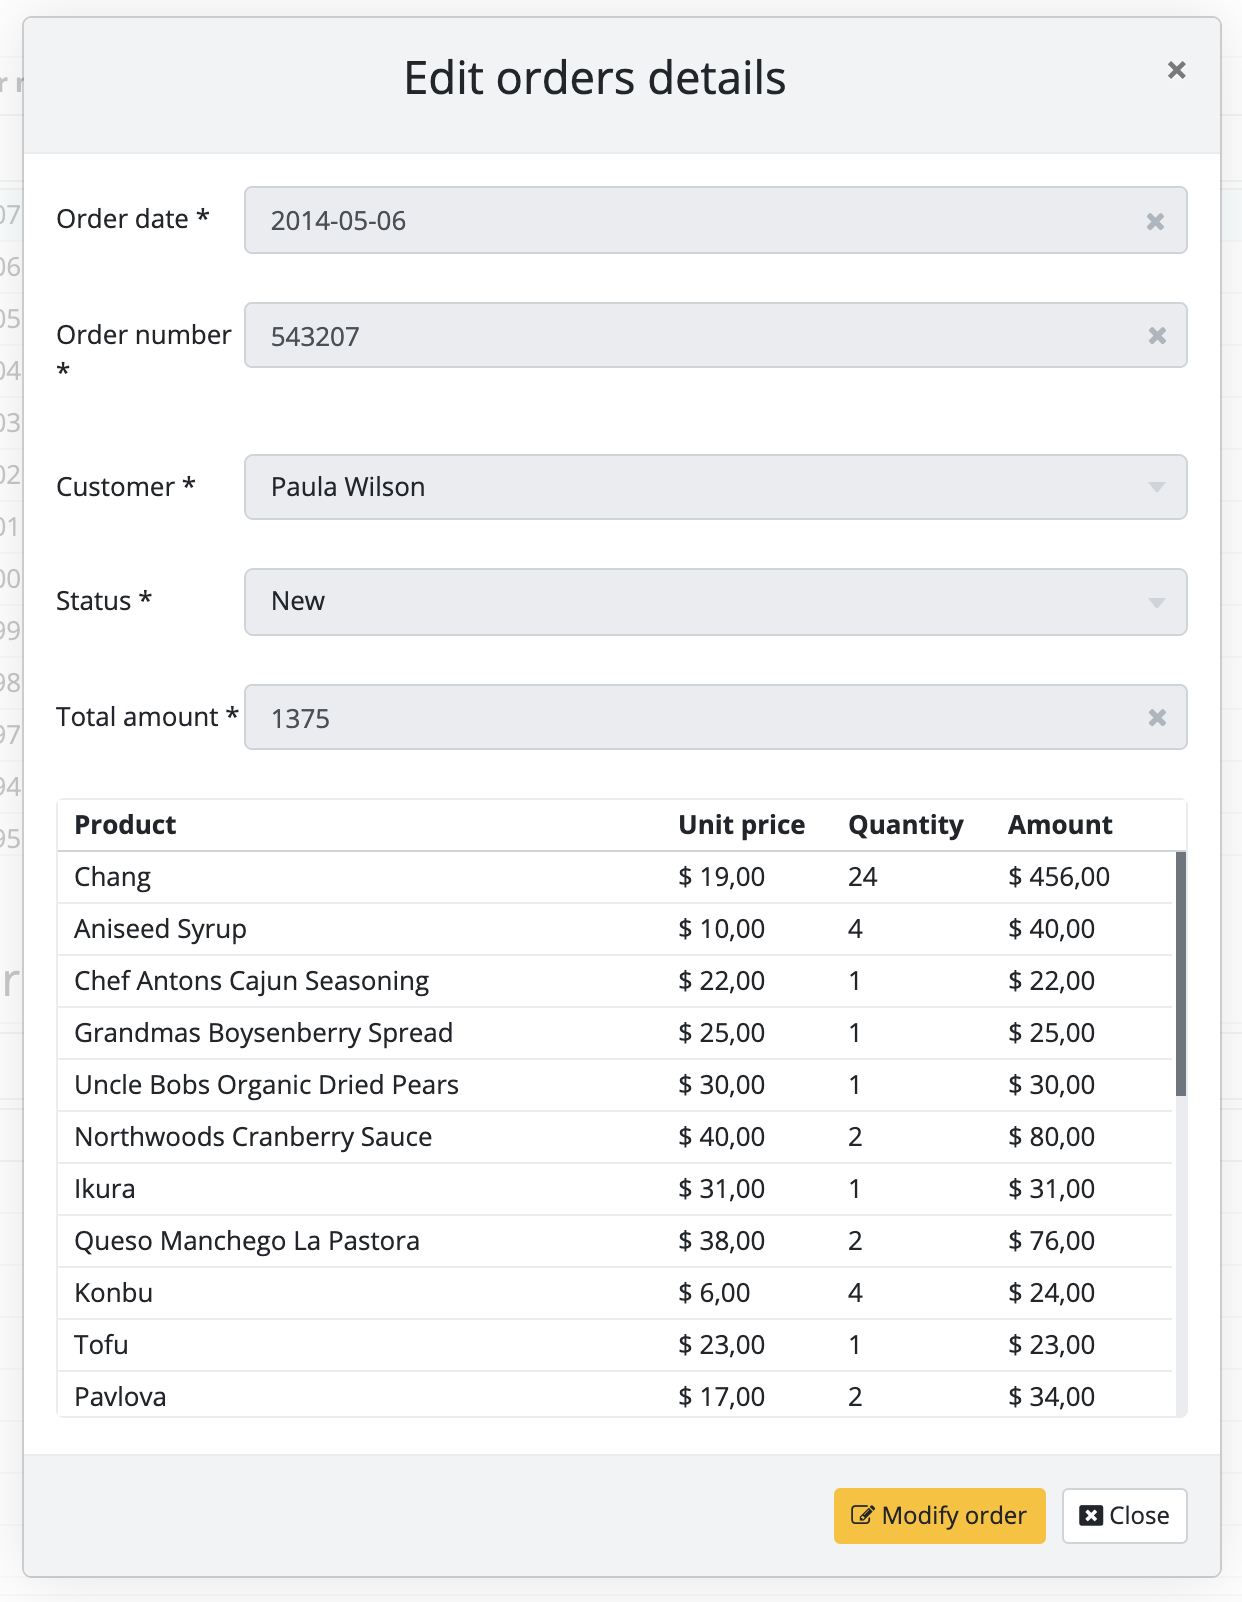
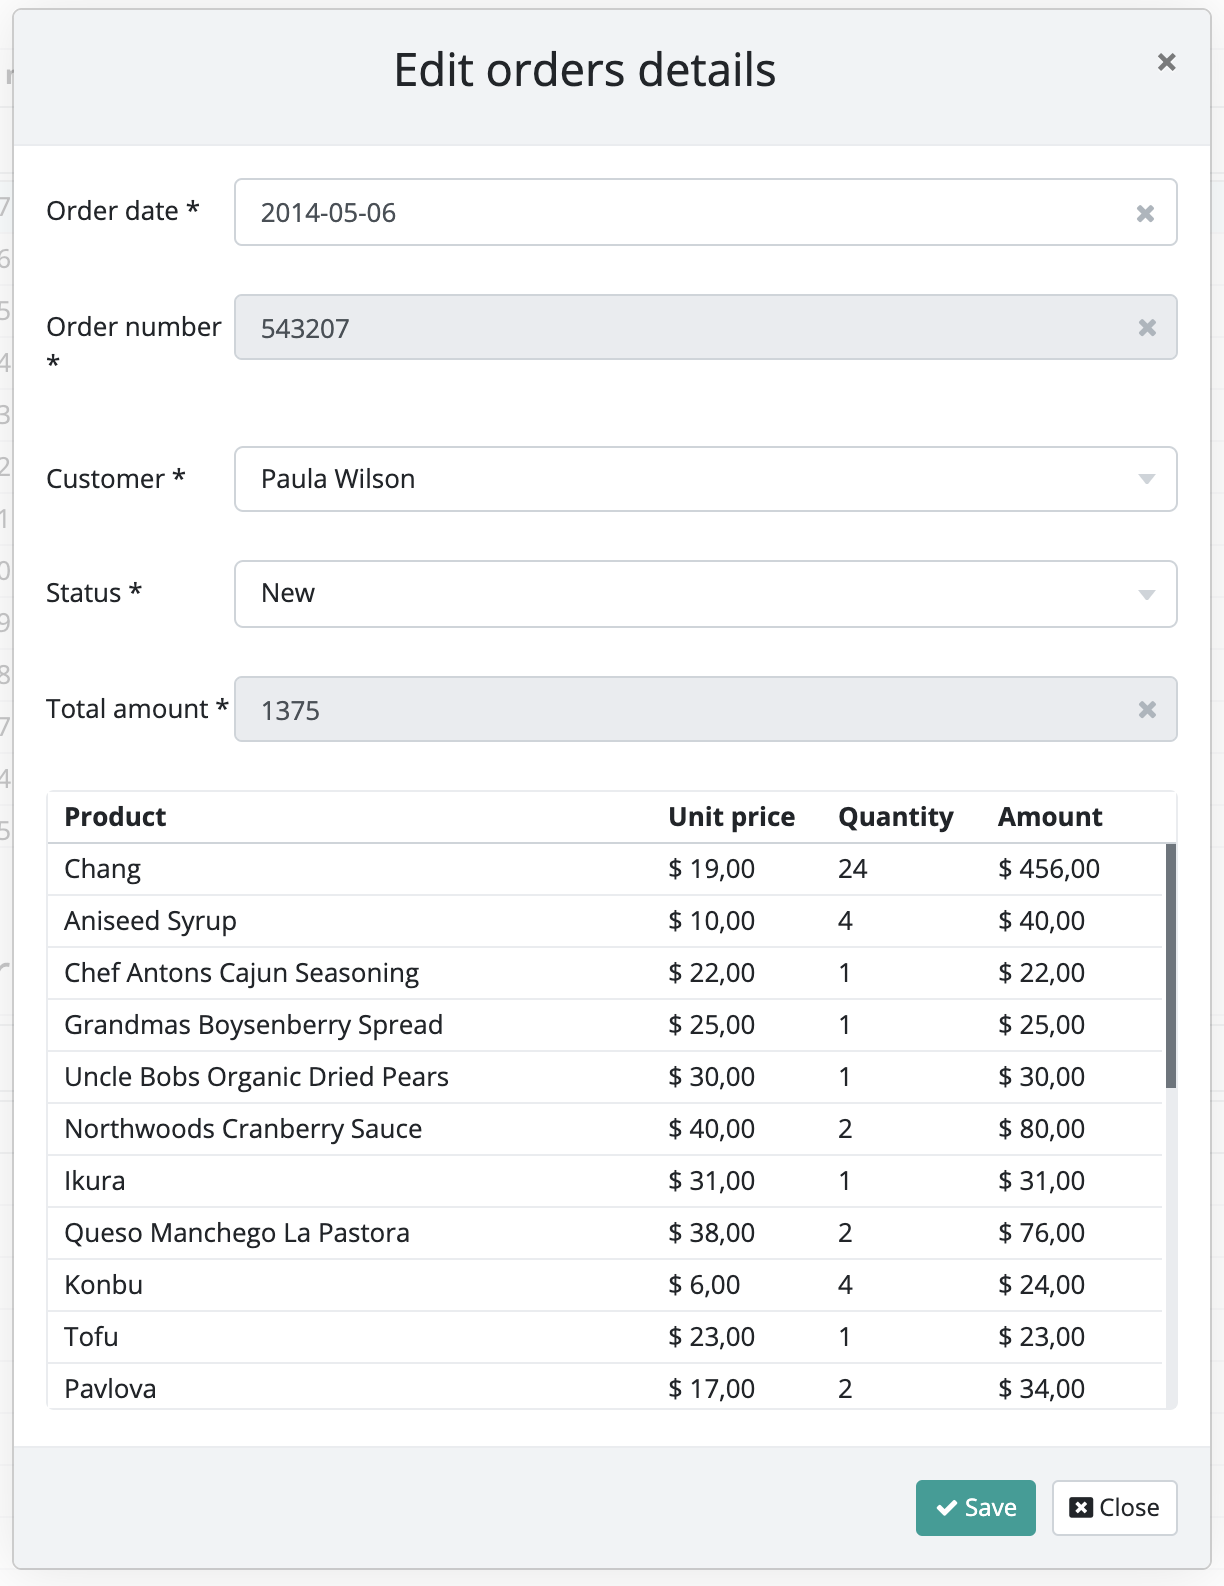
You only need to implement the pop-up window and use it to display and edit order details. You can do this at this point, but it’s much more useful to do it in a separate method, making your code more transparent. This is exactly what we do in the current example. Leave the constructor as it is.
Create a private method that builds the pop-up window:
In this method, create all the components for the pop-up window and create the window itself. First, create a Form to display and edit the data. Create the Form – just like the list – based on the orders DataDescriptor, so you won’t have to instantiate and set unique components later on.
In the example, create a class variable for the Form , so that it is easily accessible from other methods. With the above code line, the entire form is ready. Create a list for the order items. This list is very similar to the details list, but here users are not allowed to apply a filter.
Once this is done, too, you only need to create the control buttons. Let's start with the save button.
In the code, we create a Button component and set its parameters. Specify a button icon in the first parameter. Specify a button label in the second parameter. Instead of using a constant, the button label is read out from the strings.properties . The following parameters specify the button’s format and type. The button should be the theme’s Primary color (green by default) and it should also be small.
Add the click event handler to the button and implement the related code. Implement the code for the form check and data save to the database (provided that the form was completed correctly).
JBStrap’s default form validator helps you easily check whether the user has completed the form correctly. Call the editorForm.isValid() method to do this. The method returns true if all required fields are completed and returns false is something is missing. There is no need to check the data, as the editor components ensure that users cannot enter e.g. a text as numeric data. If you need something more complex than this, you can add a custom validator method to the Form component, allowing you to do any sort of validation. If you choose this, however, the default validation won’t take place. In this case, you only need a default validation, so that’s what we’ll use here.
If the form is completed correctly, the data are saved to the database. This is what the editorForm.save() does. If a database error occurs during the save operation, the method throws an exception that you will have to handle in a try-catch block.
Once the data were successfully saved, you have to update the original list and the new record appears in the list. Also, update the details list and close the pop-up window by calling the editorWindow.hide() method.
If the save resulted in an error, you have to notify the user of this in a message. Display the message in the upper right corner of the page, using the Error color (red by default). The following row displays the message:
The save button is now ready. We don’t want to allow users to update data right away after opening the window, so you need to create a button for this, too:
Create another button, set the icon, the button label, button color and size, and also add a click event handler. In the event handler, you have to enable the form, display the save button and hide the edit button.
Create one last button that is used to close the window without save.
Every component is ready to be added to the window. Let’s build the pop-up window, too.
To do this, create a ModalWindow component which is a pop-up window. Use the setTitle() method to set the window title and add the content components (the form and the list with the details). Add the buttons to the window footer. The window creator method is now ready.
Create a new private method that opens the window:
The method must receive the order details in a parameter. You don’t have to get these data from the database again, as the list contains them. Pass the entire row to be edited.
The method receives the row, extracts the record, copies it and opens it for editing in the form. This is what the following row does:
Users should not be allowed to edit the data right after opening the window, so you have to switch the form to read-only mode, in other words, disable it:
Populate the list with the orders:
Hide the save button, display the edit button and the pop-up window.
Now you have the editor window and you can return to the constructor. Use the methods created above and add the components to the page.
Add another event handler to the orders list. This is the DoubleClick method.
You don’t have to do anything else than to call the openEditor() method with the selected row and open the editor window.
Finally, call the buildEditorWindow method to build the editor window when creating the page. Add the created components to the page.
Make sure to add the invisible components as well (e.g. the editor window).
The full source code is the following:
This is what the page looks like:
And this is what the editor screen looks like:
Read-only mode:
Or in edit mode:
New orders window
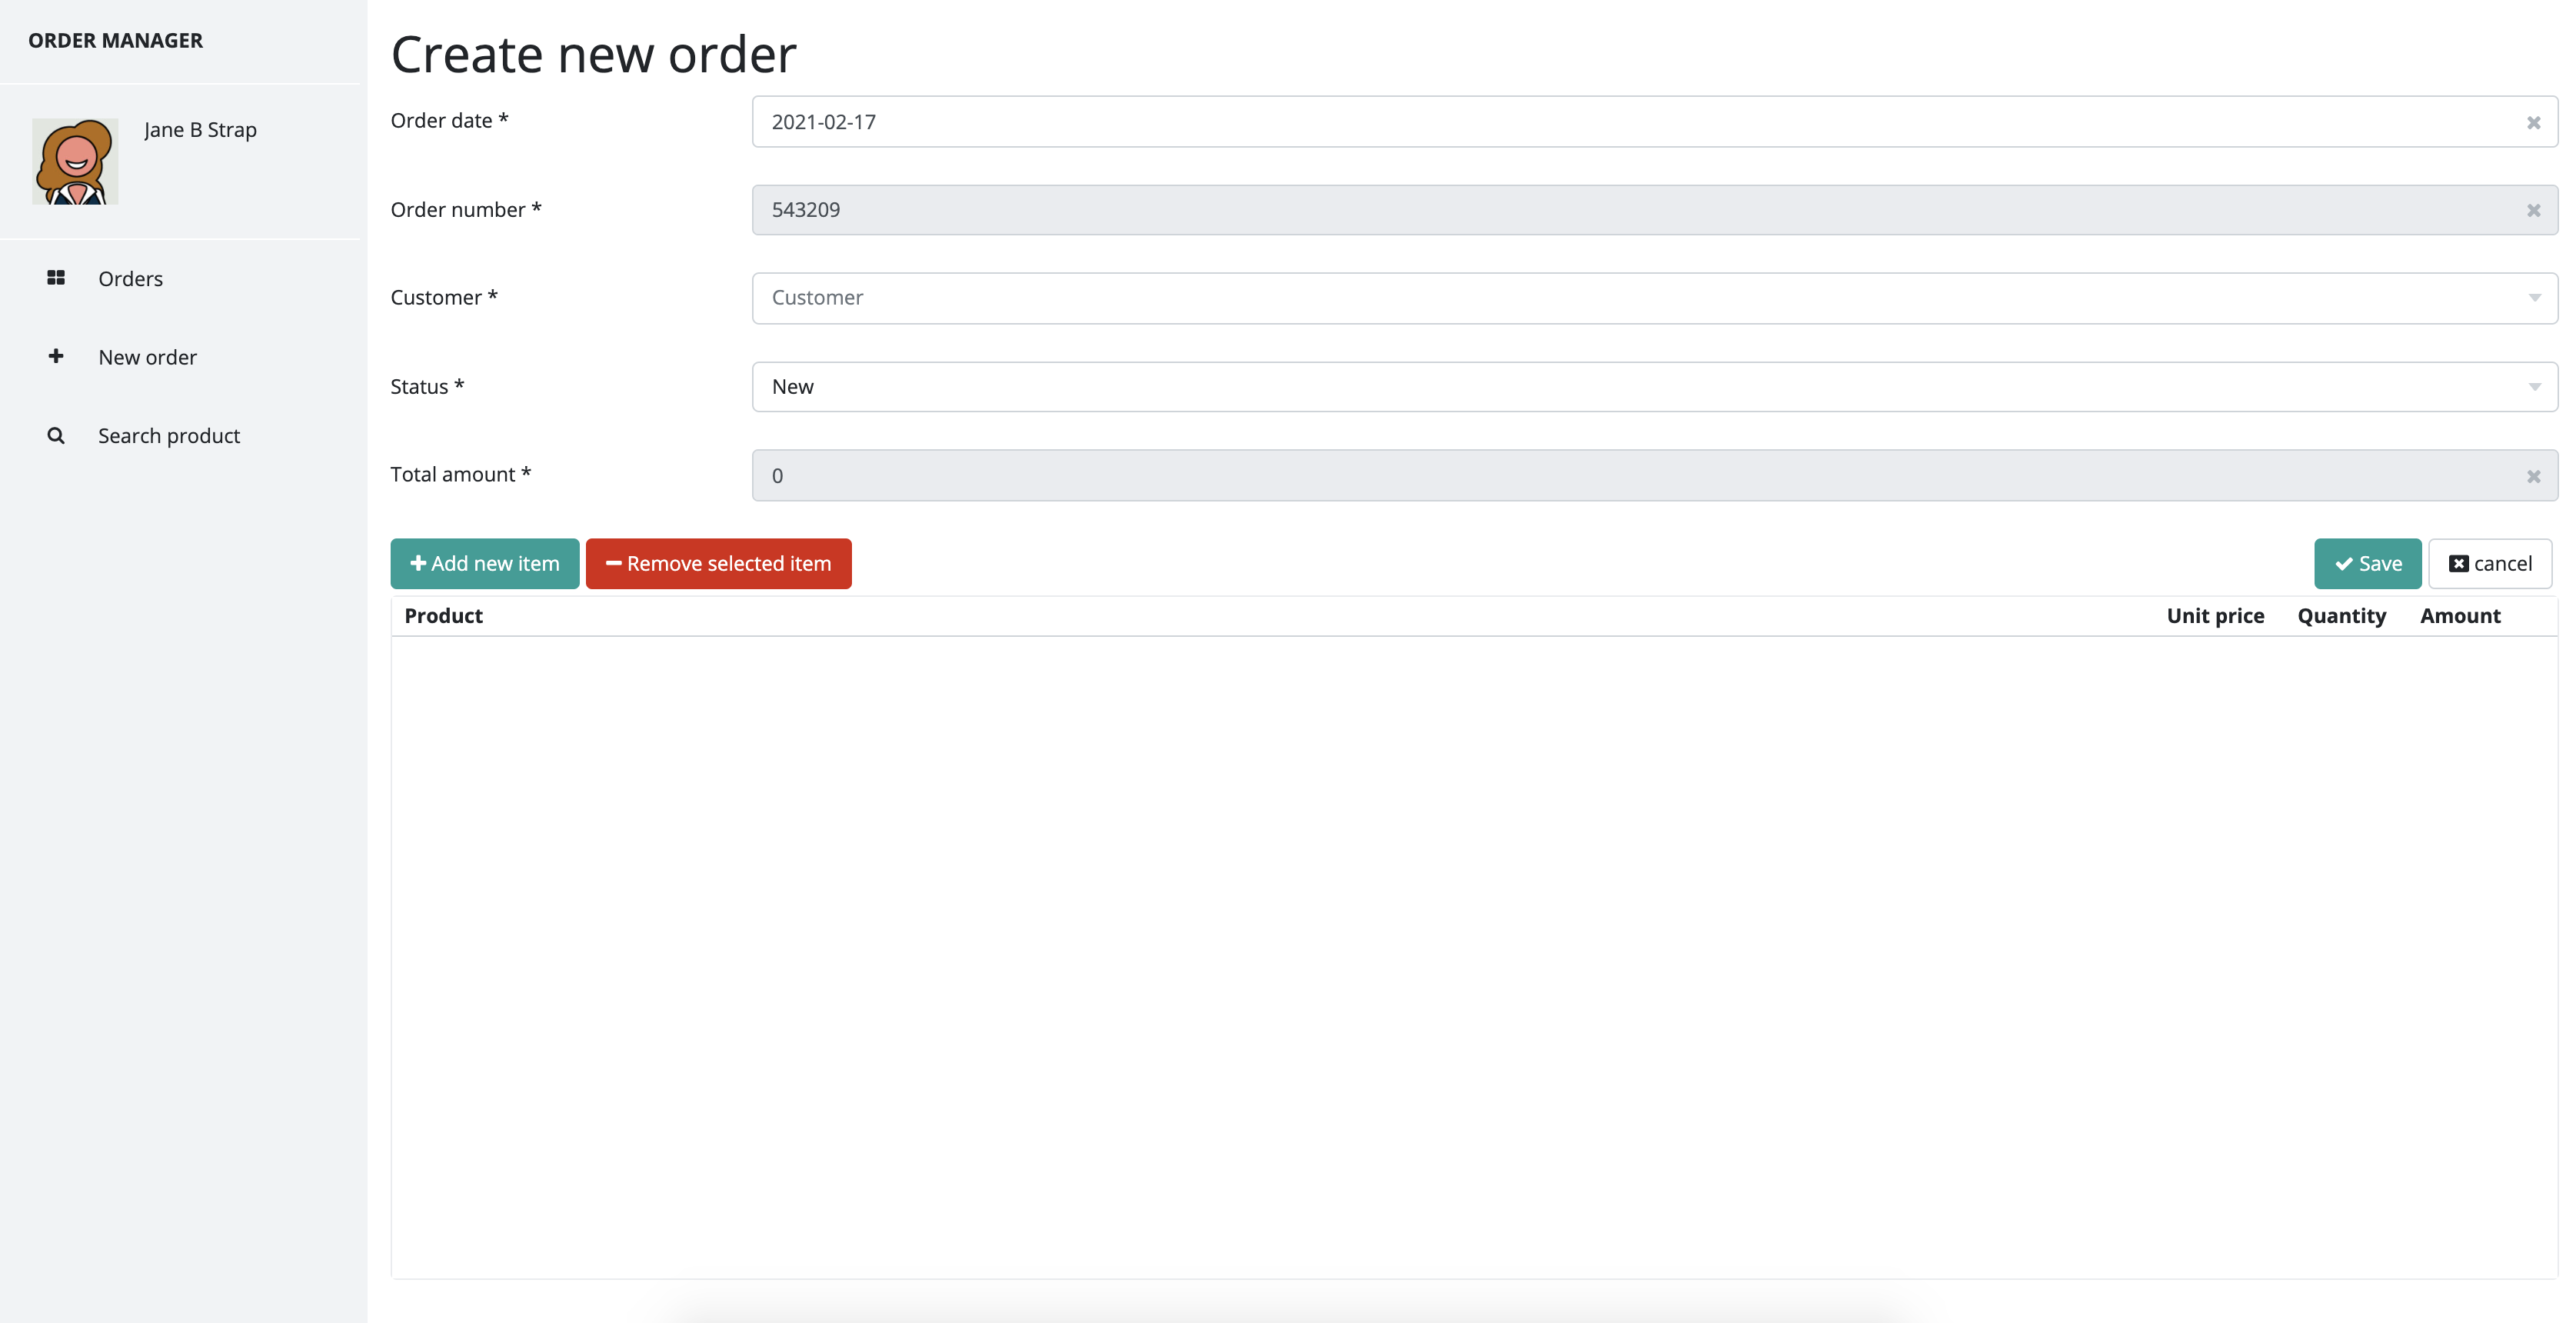
We can already search the product, view individual orders, or even modify them. Finally, let’s create a third sheet that will allow us to place a new order. Now you need to create a new class and extend it from the BasePage class as usual. Name the new class NewOrderPage .
Place a Form component on this page to edit order details. Below the form, we have four control buttons and also a list with the items ordered. We’ll need a pop-up window where you can add new items to the order and also specify the items ordered.
Let’s start building the page in the constructor. First, create the form where you can edit order details. Build this form from the orders DataDescriptor. The first line of code does exactly this:
Now, create and set the control buttons. These are the following:
This is the button that adds a new item. Add a click event handler to the button. The event handler is implemented in the addNewItem() method. The method contains the following code:
The method opens the pop-up window where you can add a new item to the order. Before opening the window, any filter criteria previously specified by the user are deleted, so that all items can be displayed again in the list. Also, the order quantity is set to a default value, in this case to 1.
Proceed with creating buttons in the constructor:
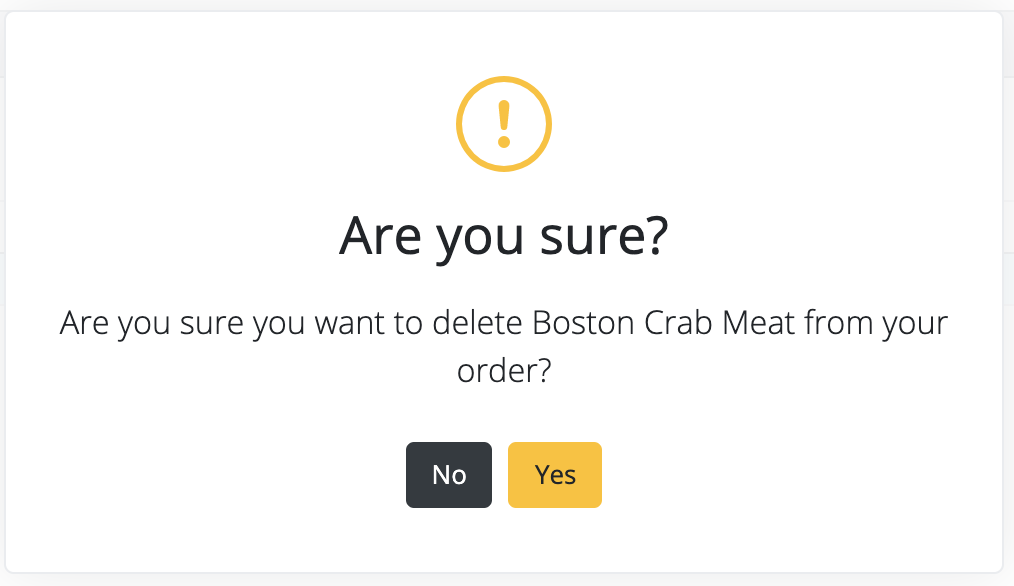
Use this button to delete a previously added item from the order. Also, add a click event handler to the button. The event handler is implemented in the removeItem() method. This method must include the following code:
First, check if the selected item is in the list. If it’s not there, no action is needed because the item in question is not selected. If it is there, we ask to user a question if they really want to delete the item. This is what the getUI().ask() method does. You have to pass the title and the text of the question in a parameter to this method. The method returns a boolean value. If the user clicks Yes, true is returned, otherwise false is returned.
The question is displayed like this:
If users confirm that they want to delete the item, use the addedItems.deleteRow(addedItems.getSelectedRow().getRowIndex()); statement to delete the current record from the list and recalculate the total order quantity by subtracting the deleted item’s quantity from the total quantity.
Proceed with creating the save button in the constructor:
A little workaround is needed to create this button. Since the buttons are placed next to one another on a Toolbar component, all buttons would be placed next to one another from left to right. Our objective here is to put the item control buttons (add, delete) to the left side of the toolbar and the order control buttons (save, cancel) to the right side of the toolbar. We achieve this by adding an automatic margin to the left of the button on the right side of the toolbar. As a result, the button aligns to the right, just allowing the other buttons to fit on the screen.
Add a click event handler to the button. Implement this click event handler in the save() method. The save() method contains the following code:
First, check if every required fields were filled in on the form. This is what the form.isValid() method does. If there is an unspecified required field, the method returns false and this results in an error message informing the user about incorrect data entry and that the order cannot be saved.
If the form was completed correctly, you have to check if the order contains at least one item. If it does not, display an error message and interrupt saving the data.
If the form was completed correctly and the order contains at least one item, save the order to the database. The save operation is slightly more complex than the previous one. The system might be able to successfully save the order details, but encounter an error when saving the associated items. If you initiate a save operation for every single record, a deadlock situation would arise in the database. We have to avoid this at all costs, as this disrupts the use of the application. This is why you have to use a database transaction.
We recommend that you use this method. Create a database transaction where you can execute the individual steps of the save operation, but only finalize the transaction when all the steps are done. If there are errors during the save operation, you can roll back the entire transaction, so the database always contains complete orders.
You need to initiate the transaction by using the following code:
Execute the following code to save the form:
We crossed two things off our to-do list. In the first step, we used the form.save() method to save the form. This time we specified a parameter to the save method that indicates which transaction to use. The save method returns the saved record. If you insert a new record, the record ID is not specified before saving (it will be assigned by the database). The record returned by the save method is the one we need, as it already has a record ID. Extract the unique ID from this record and store it in the orderId variable.
Go through all the records associated with the order and insert the order ID: addedItems.getRows().forEach(row -> row.getDataRecord().setValue("orderId", orderId));. Now you only have one thing left: save the item records to the database. Save the list to do this, otherwise you would have to save the records one by one. This is what the addedItems.save(transaction); does.
If no errors have been encountered yet, then we are ready. Execute the transaction.commit(); statement to commit the changes to the database.
Create the last button in the constructor:
By clicking this button, users can cancel the order. Add a click event handler to the button and implement it in the startNewOrder() method:
Canceling an edit is nothing else than just starting to edit a new record in the form. You can do this by calling the form.newDataRecord() method. The form now reverts to its default empty state. Specify the automatically completed values for the new record, e.g. order date, order number and total order price. Use the form.setValue() method to do this. The first parameter of this method accepts the column name. The second parameter is the column value.
Use the addedItems.clear() method to clear all items from the orders list.
Go back to the constructor and create the list of items based on the orderItems DataDescriptor.
Create a custom renderer and specify it to list’s amount column. You can include any content in the renderer, but in this case we only use it to calculate the total price of an item. We can do this by multiplying the ordered amount by the unit price:
The column renderer must always return a component that is displayed in the cell. Now we only use it to make a calculation and we only want to display a simple text. The method should return a StaticText component that is displayed in the HTML DOM.
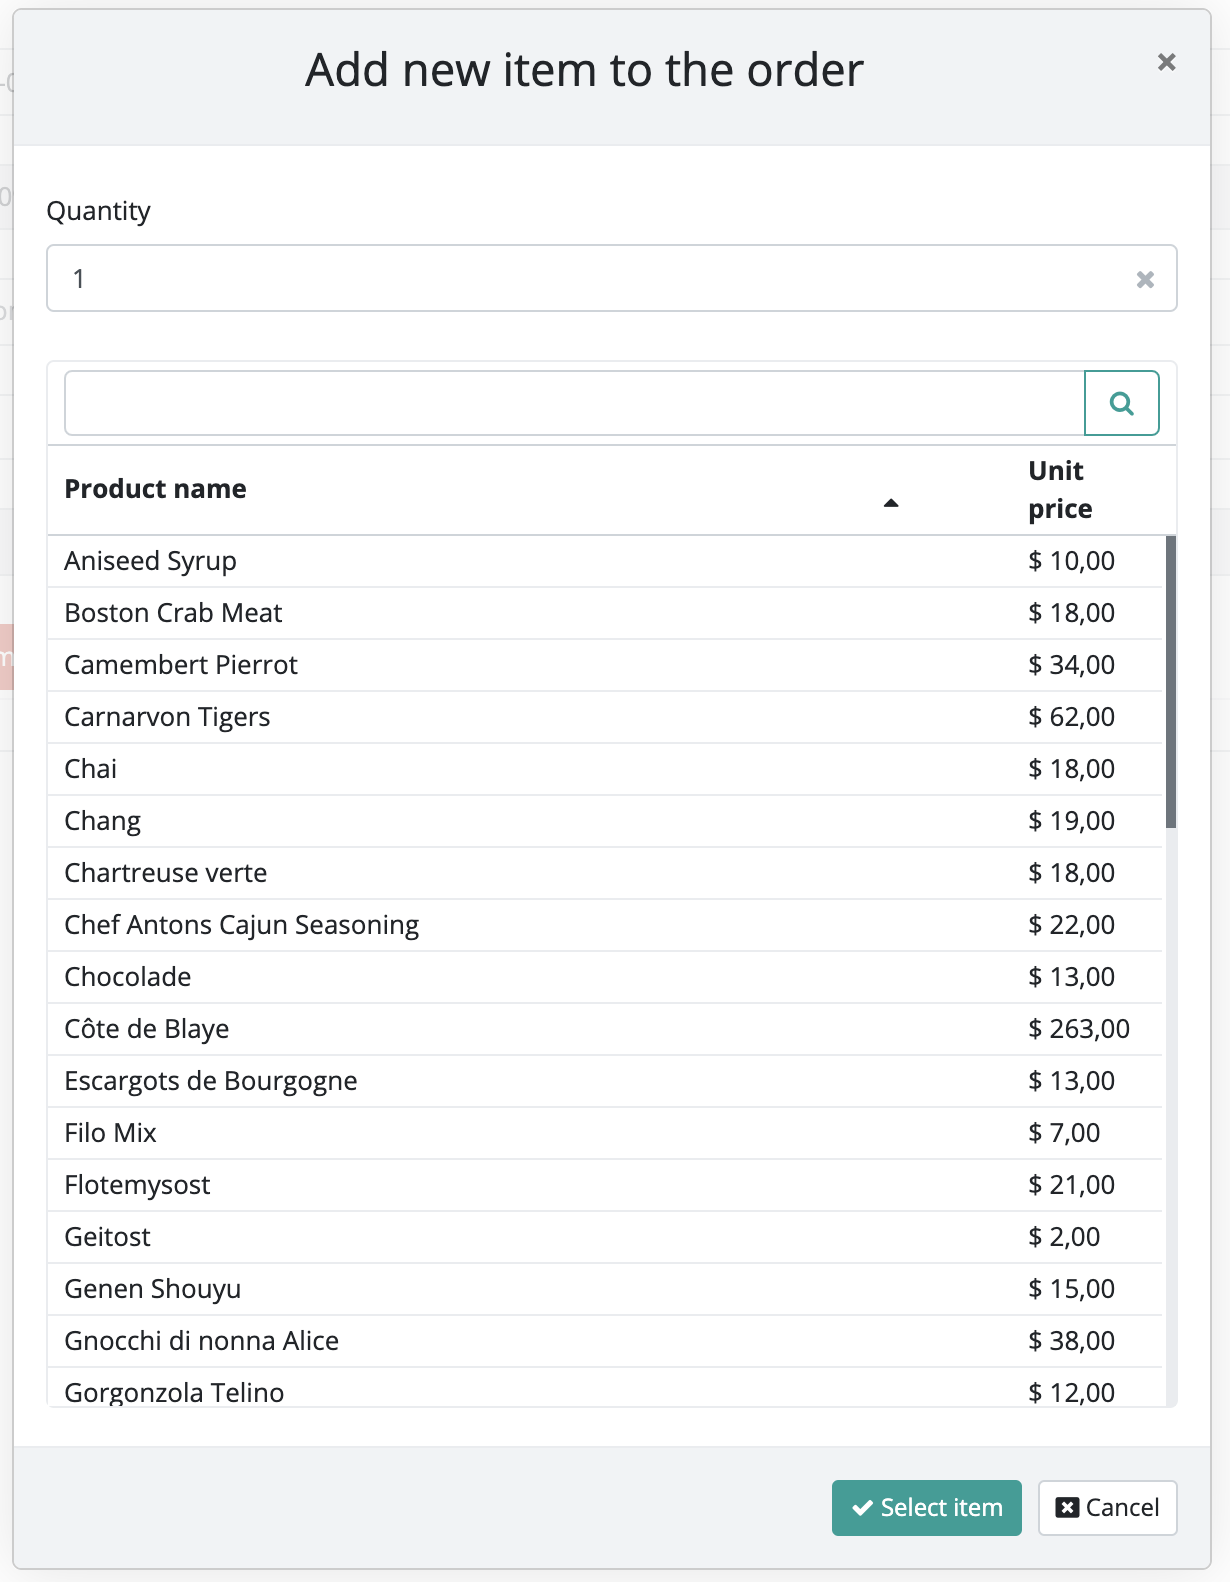
Now, create the method that builds the pop-up window and name it as buildAddItemWindow().
This method creates the modal window used to add items. On the previous page, we created a pop-up window like this one, so this one should not pose a difficulty either.
First you create the modal window and set its title:
In the next step, create the product list in the modal window. Configure this so that users can apply a text filter to the data:
We would like to display the list in a pop-up window, so it should not be too wide. Therefore we hide a couple of DataDescriptor columns, so that only relevant columns are visible to users. Calling the hide Column method hides unnecessary columns, such as supplier country, etc.
Add a double click event handler to the list: items.addRowDoubleClickHandler(event -> addItem());. Call the addItem method in the event handler. This method adds the selected item to the order. The reason why we do this is that users should be able to select an item by double-clicking them instead of always using the button at the bottom.
Create the input field where users can enter the order quantity:
As the order quantity is a numerical value, you have to use the IntegerItem component, enabling users to provide an integer number and preventing them from entering a text. Also, you can provide constraints such like users are not allowed to enter a number smaller than 1 (0 or negative).
Now, put together the contents of the window by adding the list and the entry field: addItemWindow.addComponents(quantity, items);.
You only have create and add the buttons at the bottom of the window:
As for the selector button, you have to use the same addItem() method that we used for the double click event. Since this method is not ready yet, let's write this also in a separate private method.
The code for the method is the following:
Get the selected row from the method. Check if there is a selected row or if the specified quantity is correct. If there are no selected rows or if the specified quantity is not correct, send an error message.
If everything is fine, we have a selected item and the quantity is OK, add the item details to a new record in the list. You can also modify the total order quantity, so that the new item value is added to the total. Close the pop-up window.
Once this is done, go back to the constructor and add the components to the page. Also, initiate the order right away, so that users only have to enter the data after they open the page.
The page is now ready.
The full source code of the page should look like this:
This what the page looks like:
The window for adding items looks like this: