Message based development in JBStrap
In this section, you will learn why should use the message-driven programming technique and the MessageBus . We'll take a look at an example by creating a widget-based dashboard. We will also show how to do this without using the MessageBus , so you can see the difference between using and not using a message bus.
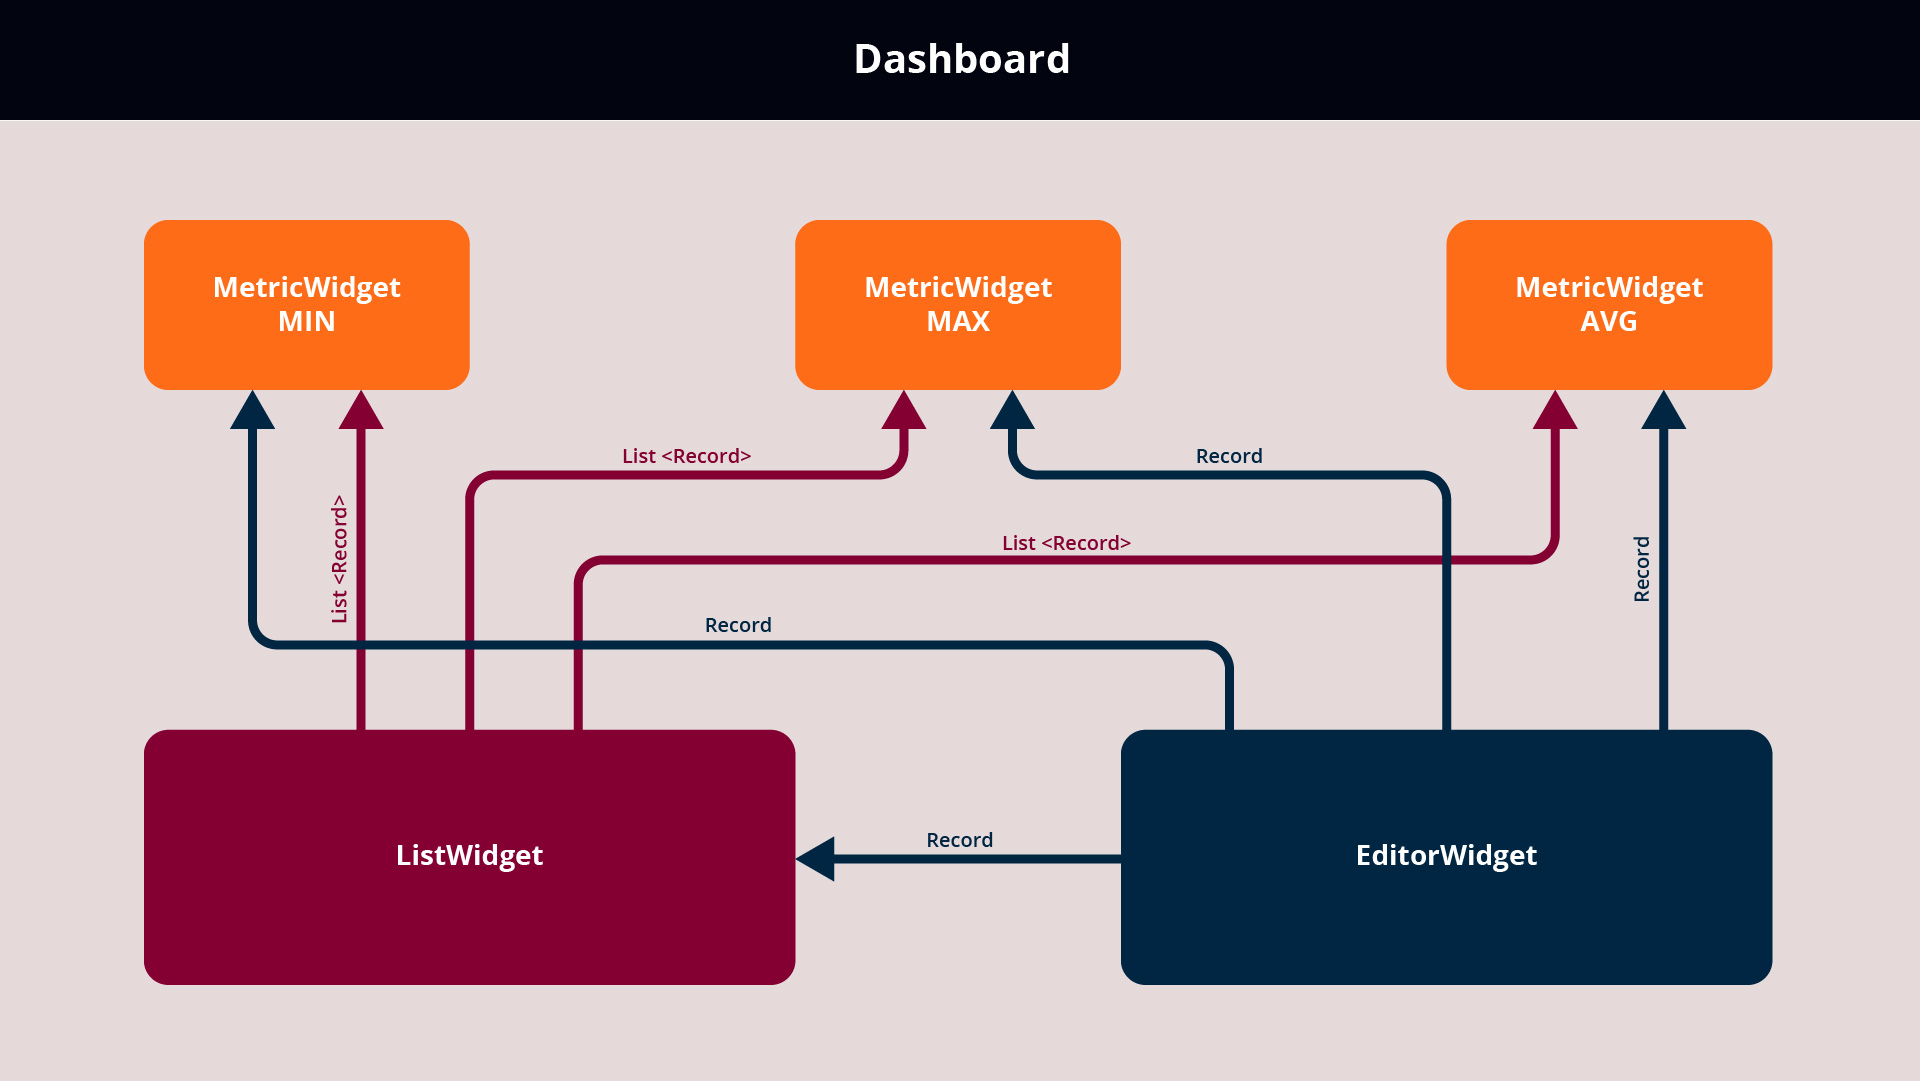
There will be three widgets in this example. The first will be a list, using the ListGrid component. It will contain data from a database. The second will be a Metric widget. This is responsible for displaying 3 pieces of information: the mean value of a field, along with its minimum and maximum value. The third widget will contain a Form, which will allow the user to add a new Record to the list.
As you can see, these three individual widgets will be implemented in three separate classes, which are completely closed. A page will be also created, where these widgets will be placed. This page will also contain the MessageBus , which will be used by to components to communicate with each other.
First, let’s see how you can start on this project, by using the MessageBus :
- Plan the communication:
When the page is opened, the data must be read from the Database. This is done by the list widget when it receives a Refresh message through the MessageBus .
The metric number needs to be displayed. This is done by the Metric widget when it receives the list of the read records through the MessageBus .
If the user adds something to the list, it must be displayed correctly, and the metric number format also need to be modified accordingly. First, when the list widget receives a Record through the MessageBus , the Record will be added to the list. If the Metric widget receives a Record , the numbers will be refreshed to the current state.
2. Now that you can see how the widgets will communicate with each other, let’s implement them.
a. First, let’s make the list widget, which extends from the ListGrid component. The automatic data query will be turned off. With this turned off, you can get the data by using the DataDescriptor , and you can manually query the data. This is done so the queried data can be sent to the other widgets, thus, you don’t have to query the same data repeatedly. Furthermore, the Metric widget will be universal thanks to this, and you can use it with any DataDescriptor . A messageBus listener method must also be implemented, in which if a widget receives a String type message, that contains Refresh , the data from the database will be queried, and sent to the other widgets through the MessageBus. If it receives a Record type message, the record will be added, and it will be displayed on the user interface.
b. The next step is creating the editor widget, with its two buttons and a form. The widget will extend from a Div component. The form is used, to allow the user to add a new record. By clicking the Cancel button, the new record will be canceled, and the editing of a new record will begin. By clicking the Save button, the Record on the form will be checked first. If it’s valid, it is sent through the MessageBus , and the editing of a new Record will begin. If invalid, the user will be informed, that they have not filled out the form correctly.
c. Finally, let’s create the metric widget. As mentioned above, three metrics will be displayed, but they are all the same. They gain different functionalities based on their parameters. In the widget’s constructor, you must specify the name of the MessageBus , that it will listen to, the type of the metric, which determines if it’s the mean, maximum or minimum value. You also need to specify the name of the column from which the requested metric is to be calculated. You also need to implement a MessageBus listener method. In this method, if the widget receives a Record type message, then the previous metric will be modified, so it also includes the value of the new Record. If the message contains a Record list , then the metric number will be calculated from the values from the record list. In both cases, the displayed value will need to be refreshed, by calling the refresh method.
As you can see in the source codes, the widgets all enclose on themselves. Every widget only processes its own data, stores relevant information in itself and do not refer to the other widgets at all. Every listener method, bus name and message type is examined, so unrelated messages cannot cause any errors, as they are simply ignored.
Each widget’s operation is implemented by itself and certain functions (such as data querying with lists) only get executed when receiving the correct type message. Also, receiving a message can lead to sending other messages. This is used by the list, to share the queried data with the other widgets. This is used to avoid multiple queries, thus saving time and resources and the query results are processed independently of each other, in parallel.
3. Finally, let’s create a page that contains these widgets. In the page constructor, a MessageBus is created with the name of Then you also specify which MessageBus es the widgets are listening to.
As you can see, three instances of the MetricWidget was placed on the page. The types of the metric numbers were also specified. After that, the list and editor widgets were also placed on the page, and the MessageBus was opened. With this, the page is done, the only remaining step is adding the part, that specifies that if the page sends a Refresh message after the page is rendered. This starts up the page and its operations.
Now you can see how the MessageBus solution works. Let’s compare it to a regular, linear implementation. The first big difference is that neither the page or the widgets reference to each other, they do not use or call each others methods. One big advantage of this is that the page can be easily modified. You can let the user build their own Dashboard since the number of widgets listening to a message is completely irrelevant to how the page works. It also doesn’t matter which page the widgets are placed on, as its operation only depends on the received messages. With regular coding, you could only do this with numerous conditions, which would lead to a lengthy, and hard to understand source code.
The other big difference is that the widgets used on the page are not class-level variables. You also don’t have to know how many pages there are, and what types of widgets are used. You don’t need code for the individual business flows, as every widget works on its own. This also means that that the individual widgets work independent from each other, on separate threads, parallel, thus not slowing down the response time of the user interface.